
iPhone background-removal guide
How to Fix Hair and Edges After Removing a Background
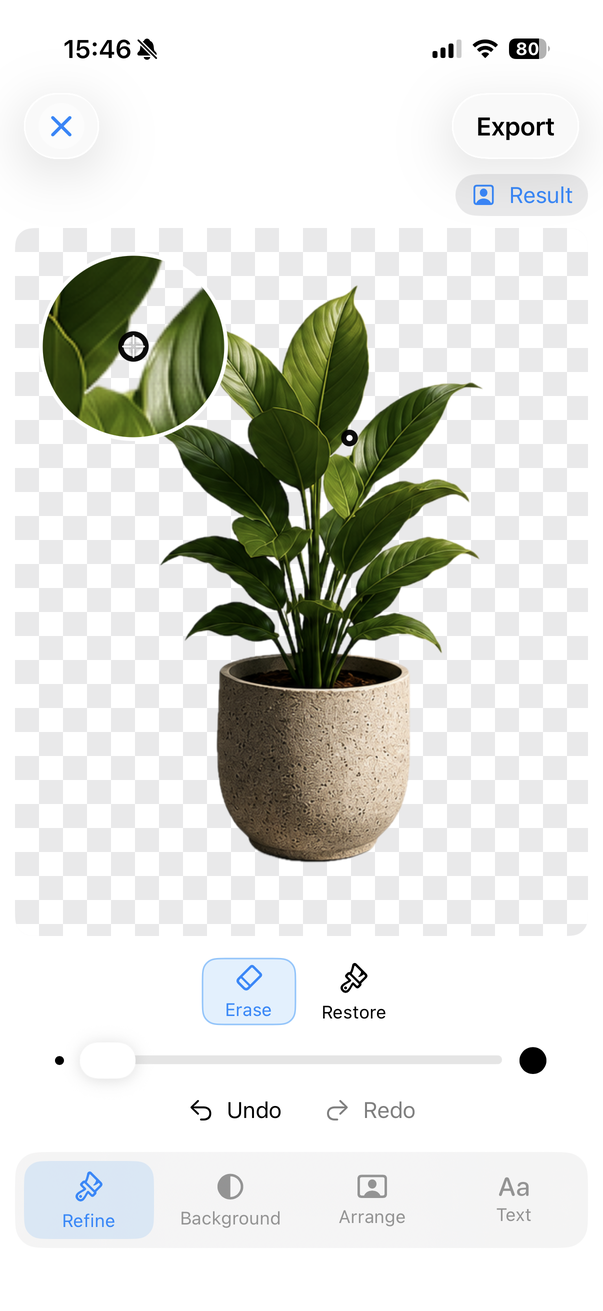
Review the automatic cutout, erase leftover background and restore missing subject details. Remove BG & Eraser includes manual erase and restore controls with a magnifier to help you refine difficult areas before export.
Remove BG & Eraser includes 3 free exports and an optional one-time Lifetime Unlock. No subscription.
Why does automatic removal sometimes need correction?
An automatic cutout is a useful starting point, but a photo does not always contain a clear boundary between subject and background. Similar colors, motion blur, loose hair and small gaps can make that boundary ambiguous. Some of the original setting may remain, or part of the subject may be removed.
Manual refinement lets you decide what belongs in the cutout. It cannot recover information that was never visible in the original photo, and it does not guarantee perfect hair extraction. The practical goal is a convincing outline for the background and viewing size you intend to use.
First identify whether to erase or restore
Look at the whole cutout before concentrating on a small detail. Identify the area that needs correction and compare it with what you wanted to keep. A patch of the original wall beside a sleeve needs erasing; a missing part of the sleeve needs restoring.
Use erase for unwanted background that remains attached to the subject or visible inside a gap. Use restore for useful subject details that automatic removal excluded. Work in small areas, then look at the full image again to make sure the correction still fits the silhouette.
Refine hair without turning it into a hard outline
Start with the main shape of the hair. Check whether a large section is missing or whether obvious background remains around it. Correct these larger issues before spending time on individual wisps. The magnifier can help you distinguish small strands from unwanted fragments.
Fine hair often includes the original background between strands. Restoring broadly can bring that background back with the hair, while erasing too aggressively can flatten the shape. Make limited corrections and judge the result at normal viewing size rather than treating every faint strand as essential.
If the source has soft focus or the hair closely matches the background, accept that some detail may be difficult to separate. Trying a different source photo can be more productive than repeatedly correcting an uncertain boundary.
Check fingers, straps and gaps
Small openings deserve their own pass. Inspect the spaces between fingers, an arm and the body, or a handle and an object. These gaps should reveal the new background where appropriate, even though they sit inside the subject's overall silhouette.
Erase remnants in those spaces carefully so you do not remove a finger or thin strap. Restore missing details only as far as needed. Check both ends of a thin feature: a strap that looks correct in the middle may still be broken where it meets the main subject.
Inspect clothing, soft edges and transparent areas
Look along sleeves, shoulders and hems for a fringe of the original surroundings. A pale outline may be difficult to see on white but obvious on a darker replacement. Conversely, a dark remnant can disappear against a dark background and become visible on a light one.
Fine fabric, translucent material and blurred edges need judgment. Where the original background was visible through the subject, the separation may be uncertain. Erase and restore can help you make local corrections, but they are not a promise that the app can reconstruct the material against every possible new scene.
Avoid making one part of the boundary much sharper than the rest. Review the complete image after each area so a local correction does not make the overall cutout look uneven.
Use another background as an inspection surface
Try a contrasting solid color to reveal the outline. A light background helps show dark remnants; a dark one helps show pale fringes and missing areas. If you plan to export with a photo background, check against that photo too.
For a transparent PNG, the checking background is temporary. Return to transparency before exporting. For a white-background image, return to white. This final background check prevents a useful inspection step from accidentally changing the output you wanted.
Know when to stop and export
Review the cutout at its intended viewing size. If the subject is recognizable, important details are intact and no obvious background pieces remain, the result may be ready. Very close inspection can reveal details that will not matter in a small social graphic or slide.
If a visible problem remains, decide whether another small correction will help or whether the source itself is limiting the result. A clearer photo or simpler replacement can be a better choice. There is no need to force a difficult image into a perfect outline.
Export only after checking the final background and composition. Remove BG & Eraser includes 3 free exports and an optional one-time Lifetime Unlock, with no subscription. The related guides explain how to carry the refined cutout into a transparent PNG or a completed background replacement.
Related workflows
Try the workflow on your iPhone
Remove backgrounds automatically, refine the cutout and export or replace the background with Remove BG & Eraser.

3 free exports. Optional one-time Lifetime Unlock. No subscription.